You may encounter this error due to the following reasons:
- The same contact number may have been mistakenly used for another parent or staff member.
(Ensure to check any sibling related account for any old academic session.) - You are attempting to register a second user profile using the same contact information.
To resolve this issue, follow the steps below:
1. FINDING & CORRECTING CONTACT INFORMATION
If the same contact number has been mistakenly assigned to another parent or staff member, follow the steps below to correct this error.
FINDING CONTACT INFORMATION
To locate and verify where the contact information is currently being used:
Step 1: Navigate to Settings -> Administration -> School Setup -> User Account Management.
Step 2: Go to the Parent section, click the Activated tab, and use the search option.
Step 3: Search for the conflicting contact details (e.g., mobile number or email).

Step 4: If the information is not found in the Parent section, repeat the search in the Staff section
Note: If the information is not found in either section, review the Parent records from previous academic years as well.
Once you have identified the incorrect mapping, follow these steps:
CORRECTING CONTACT INFORMATION
To update the contact information for the correct user:
PARENT DETAILS UPDATE
If the incorrect mapping is associated with a Parent profile:
Step 1: On the transaction side, Navigate to Student -> Student List & Reports -> Student List.
Step 2: Search the Parent using the parent’s mobile number or email for whom the contact information are incorrectly updated in the system.
(You can use the following abbreviations to search:<P.MobileNumber/E.Email>)

Step 2: Go to Parent tab -> Click Edit -> Modify the mobile number or email and SAVE the changes.
(Verify the details to ensure they are correctly updated.)
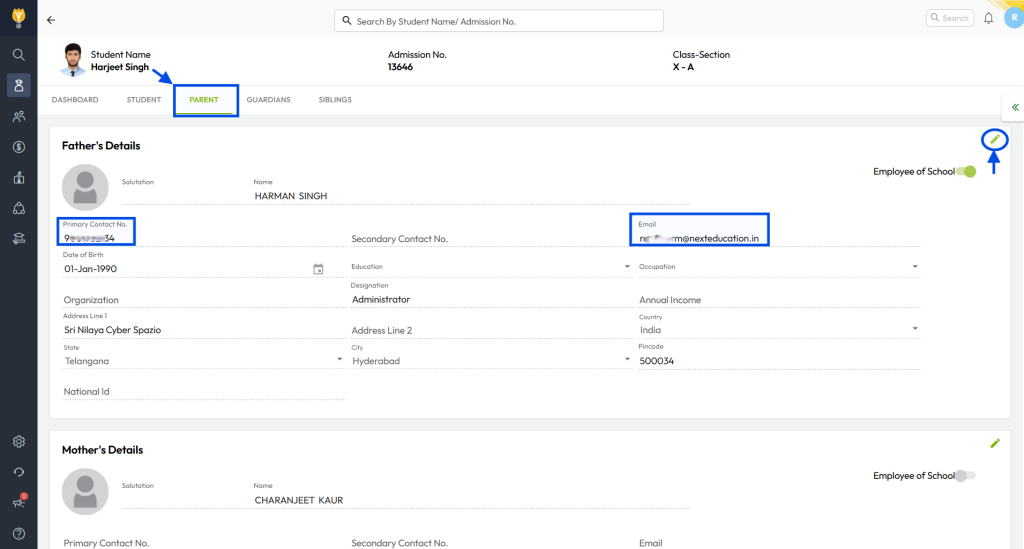
Step 3: Go to User Account Management -> Parent/Staff -> Not Created tab. Search for the user associated with the error and click Create Account.
(Next, follow the necessary steps for activation to enable login access.)
Proceed to the next section if your error is related to registering a second profile.
STAFF DETAILS UPDATE
If the incorrect mapping is associated with a Staff profile:
Step 1: On the transaction side, Navigate to Staff -> Staff List & Reports -> Staff List.
Step 2: Search the Staff using the parent’s mobile number or email for whom the contact information are incorrectly updated in the system.
(You can use the following abbreviations to search:<P.MobileNumber/E.Email>)

Step 3: Go to Personal tab -> Click Edit ![]() -> Modify the mobile number or email and SAVE the changes.
-> Modify the mobile number or email and SAVE the changes.
(Verify the details to ensure they are correctly updated.)
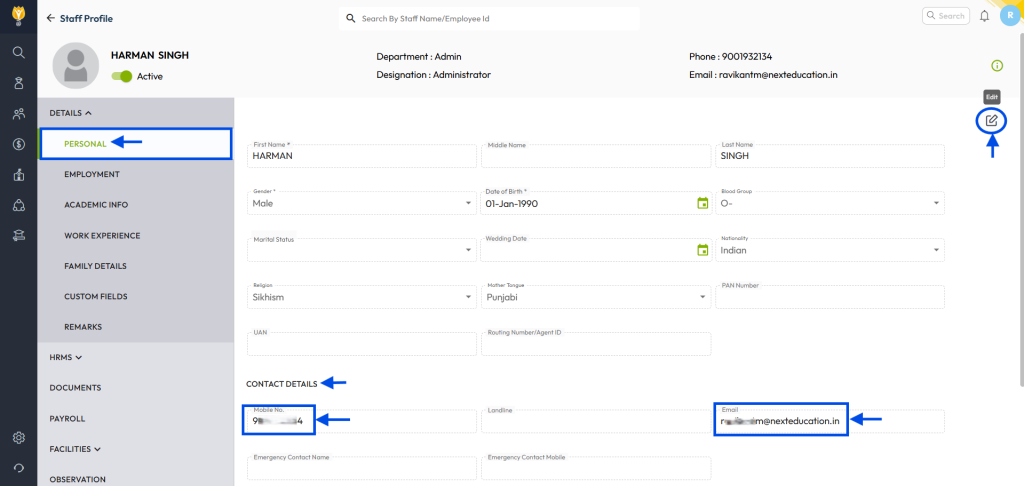
Step 3: Go to User Account Management -> Staff/Parent -> Not Created tab -> Search for the user associated with the error and click Create Account.
(Next, follow the necessary steps for activation to enable login access.)
In case the details needs to updated for any Parent then follow:
2. REGISTERING A SECOND PROFILE (PARENT/STAFF) WITH THE SAME CONTACT INFORMATION
If you need to register a second profile with the same contact details, you must map the staff member as the corresponding student’s parent. Follow these steps:
Step 1: Login to Admin account and Navigate to Student -> Student List & Reports -> Student List
Step 2: Search for the student for whom the merging needs to be done, and select the student.
Step 3: From the Student360 dashboard, go to the Parent tab.
Step 4: Click on ![]() icon to modify the Parent details.
icon to modify the Parent details.
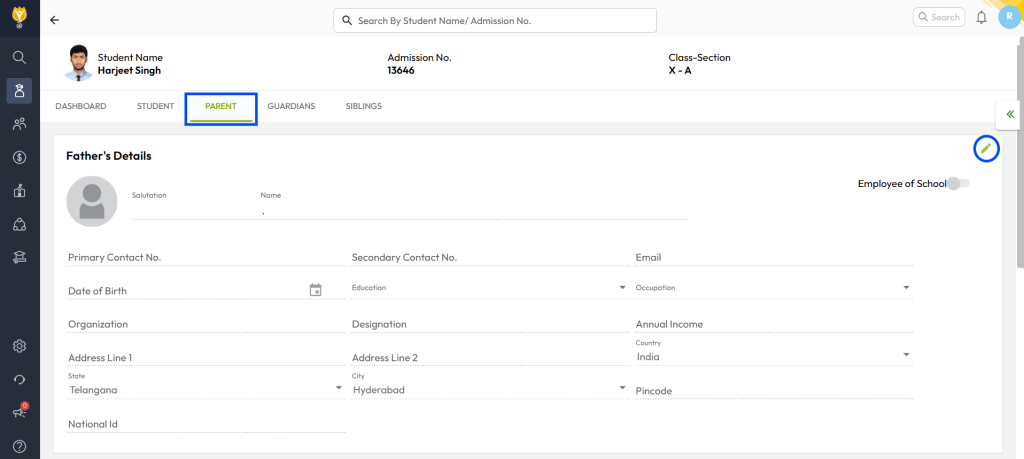
Step 6: Search for the staff member to be mapped as the parent. Select the appropriate staff member and click Continue.
Note: This mapping is gender-specific, so ensure the correct parent type (father or mother) is selected before proceeding.
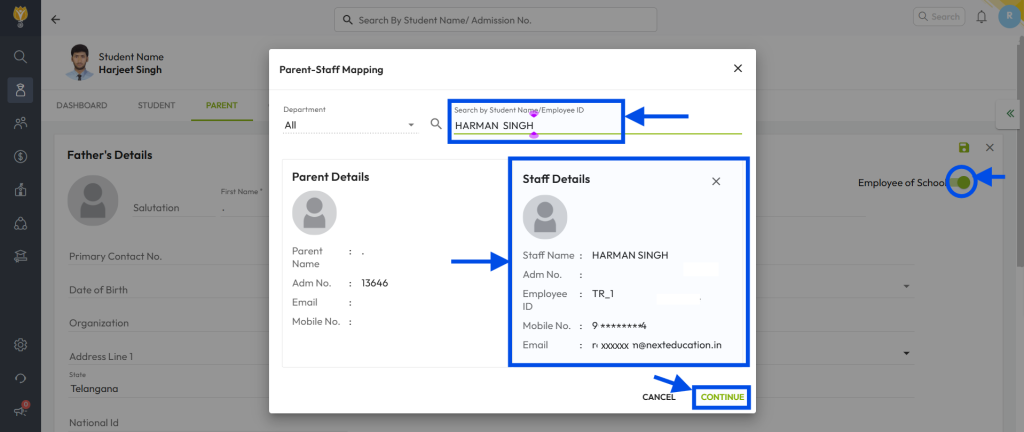
Step 7: Review the auto-filled details under the Parent section and and Click on ![]() (save icon) to apply the changes.
(save icon) to apply the changes.
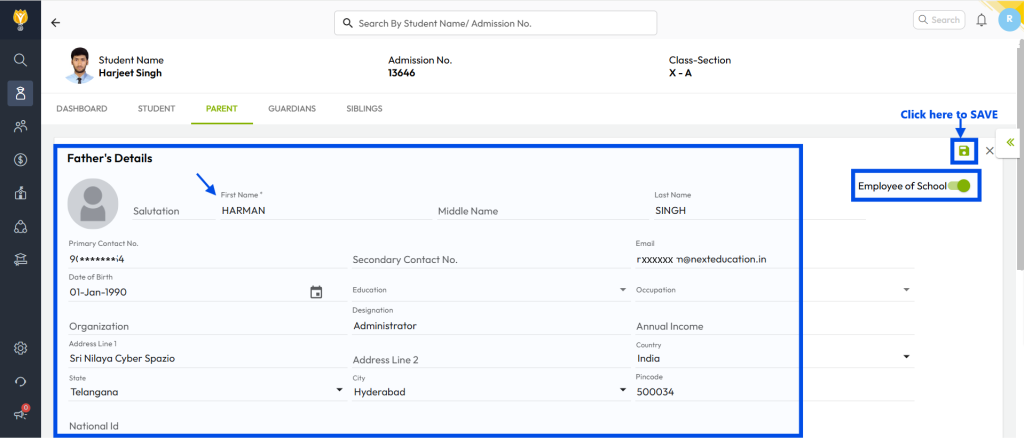
Step 8: Navigate to Settings -> Administration -> School Setup -> User Account Management, select Parent/Staff, go to the Not Created tab, and create the account.
Congratulations! The second profile Staff -><- Parent has been successfully created without requiring activation OTP.
Step 9 : To validate the recently activated account, navigate to the Activated tab.

