The Bulk Upload feature is the most efficient way to enroll multiple students using simple excel templates. Follow the steps below to complete the process.
We recommend you to use the web version at www.nextgurukul.in for a smoother experience.
Step 1: Choose Template & Download
1. If you are an admin, Navigate to Home > School Workspace > Manage Students.
If you are a teacher, Navigate to Curriculum > Course > Manage Students.
2. Tap on Bulk Upload in the Add Student section.
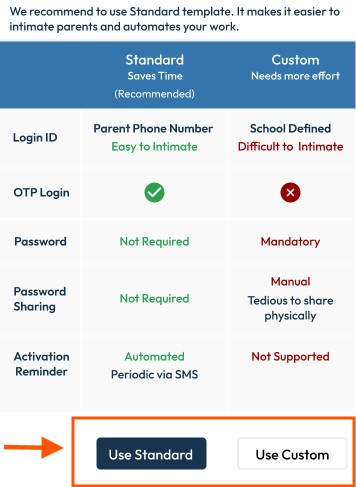
3. Select a template by tapping on “Use Standard or Use Custom”
- Standard Template – Uses the Parent/Student Phone Number as the username
- Custom Template – Requires a unique Login ID.
It is recommended to use Standard template as it makes it easier to share the login details with students/parents.
4. Tap the Download Icon to download the Excel file.
Step 2: Prepare Data & Upload
Prepare Data
Important: Ensure all data is correctly entered to avoid validation errors.
Refer to below table for better understanding on each column:
| Column | Standard Template | Custom Template |
|---|---|---|
| 1 | Phone Number | Login ID (School defined unique identifier for username) Recommended : Admission number |
| 2 | Student Name | Student Name |
| 3 | Class (Use dropdown to select, It will be based on school subscription) | Class (Use dropdown to select, It will be based on school subscription) |
| 4 | Section Enter manually from A, B, C, D (Raise a request to support team for more section) | Section Enter manually from A, B, C, D (Raise a request to support team for more section) |
Note : We strongly recommend to use custom template if you are accessing the Next Gurukul from Middle East region.
Upload the File
5. Click on + Add Excel File to Upload and select your prepared file.
Step 3: Validate & enroll Students
6. The system will automatically validate the uploaded file for any errors, Review the validation results & Tap Create Students to upload all the valid entries.
- If the validation is passed – Valid entries shows you the number of records
- If there are Invalid Entries – Download the error list, Hover over the error cells to view the exact reason, Fix the errors and re-upload the corrected file.
7. Once the file is uploaded, the status will change to User Added Successfully. Click Done to exit the upload screen.
Password Creation Guidelines
If using the Custom Template, the system will prompt you to select a password generation method:
| Template Type | Password Generation |
|---|---|
| Standard Template (Username: Student Phone Number) | Password need not be set by you. It can be set by the student during the first login via OTP. |
| Custom Template (Username: Login-ID) | Choose from: 1. Autogenerated: System will automatically generate & assign unique passwords for all the valid students. You can download the login details in bulk and share it to students 2. Common Password : You can enter a common password for all students. (Less secure; Students must change it on first login). |
📖 For a detailed guide on password information, refer to:
How can I download student passwords in Next Gurukul?